

 We made a bridge! Part 1 of 2
The cats weren't using the rope ladder we made for them to climb up to their shelf, so we thought a bridge might work better. We thought about buying one, there are some neato fancy ones on Chewy.com, but those just don't fit into our budget at the moment. Purrhaps in the future.

So we took it into our paws to make a bridge. We looked around at what supplies we could use, we had the wood and a drill but needed some rope. And yellow paint, and some sparkles. Luckily Michael’s had everything we needed. We got hemp cord to hang the bridge, color-shifting yellow paint, and of course some sparkly paint. They even had some cat-shaped stencils!

Once we had our supplies ready we got work. First, we had to cut the pieces of wood that would make the steps for the bridge. We only have one saw and it took a little while, but we got the pieces cut to 6”x2”. Then we sanded the edges and drilled a ⅛” hole in each corner ½” from each side. Lil’ Fluff is our Lil’ Helper when we’re working on projects that involve tools, this time she wanted to help monitor the sawdust falling off the woodblocks from the sanding and drilling. *FYI Chewy boxes repurpose as great temporary workstations, paint tables, and dust catchers when working on projects indoors.
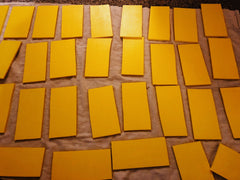

Once the blocks were sanded, we applied the first coat of Daffodil Yellow. Then the second coat and finished with the color-shifting paint. The sparkles were painted on the sides of the wood blocks to give a little sparkle but not too much.

We’ve put enough furniture together to know to number the pieces in the order in which they should be assembled, in case the cats decided to play with the pieces and lose them under the couch. Which they did. We stacked our pieces and placed them to the side while we got the rest of our supplies ready to thread the bridge together and hang! *This is part one of a two part post. This project was constructed twice and images shown represent both constructions.


